Pages

Search this blog...

Tuesday 9 July 2013

OSGILIATH, PART 3

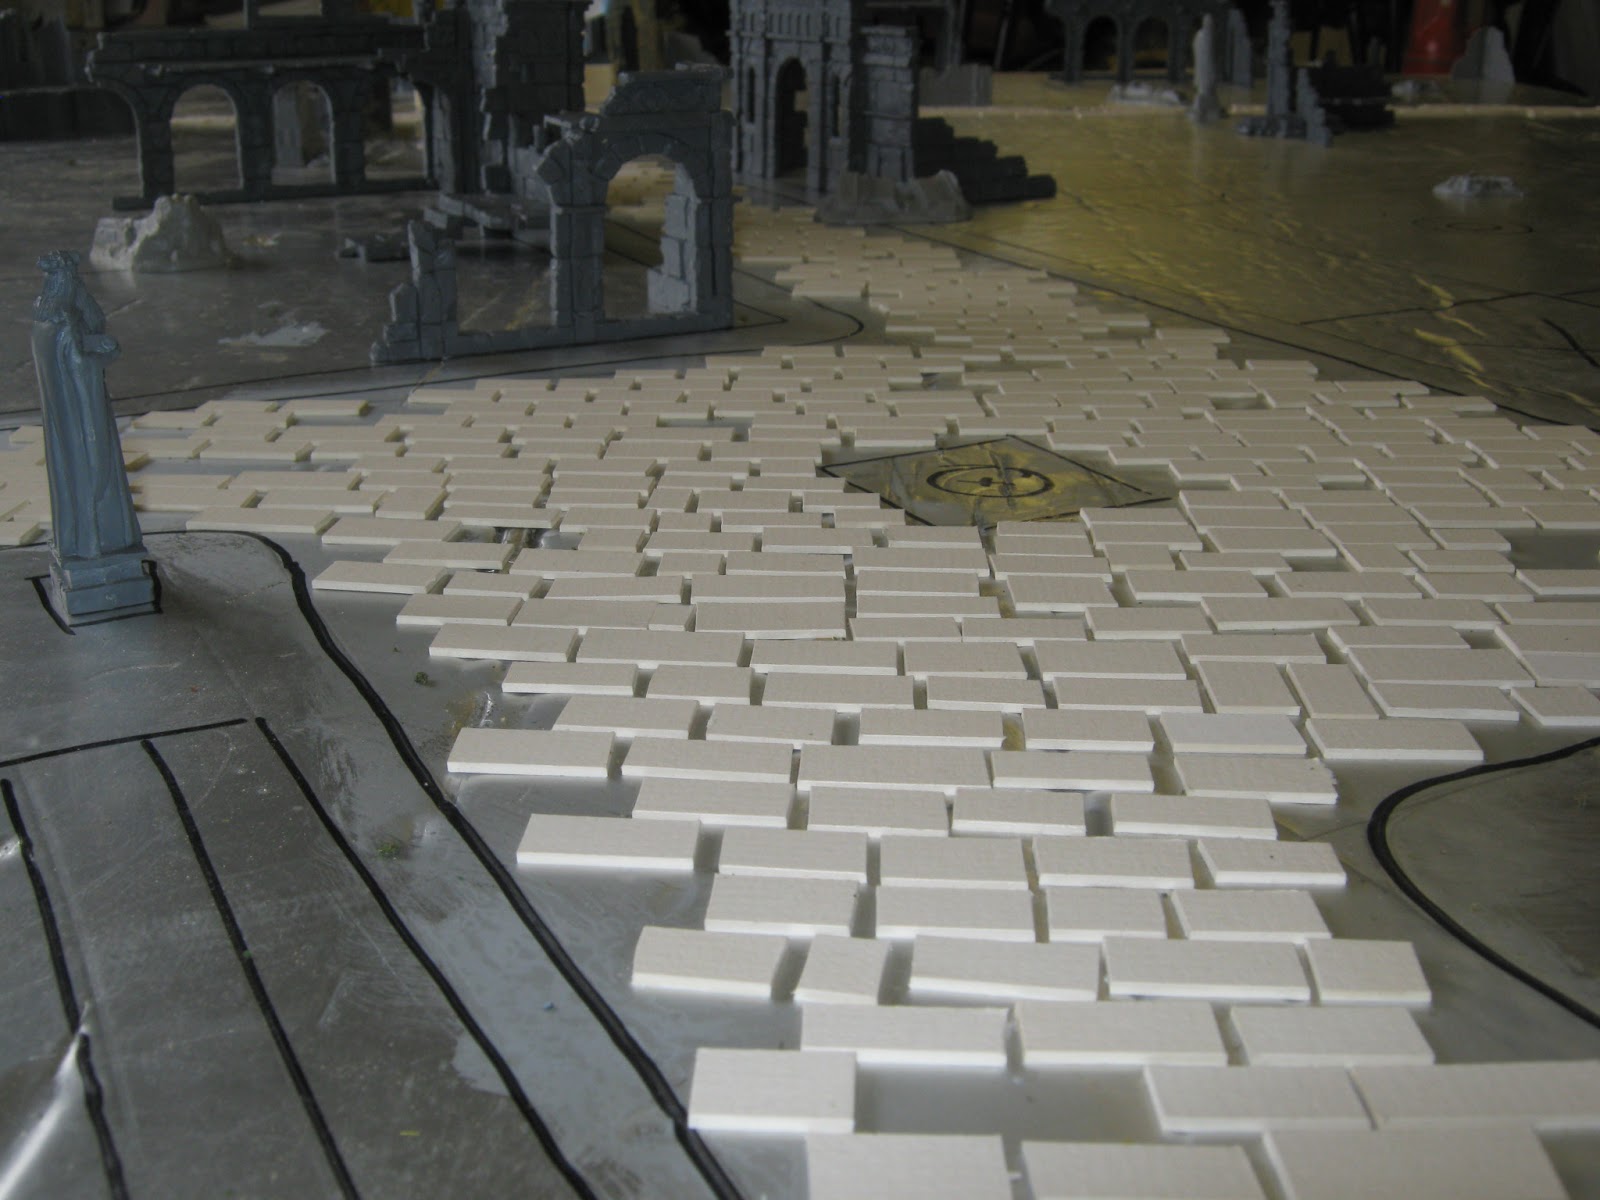
When I last showed the board, it had just been covered with sand, the buildings had been glued into place, everything was ready to paint. Unfortunately, in the excitement, I forgot to take many photos of the painting stage. Know the entire board, sand included was painted the same way I showed you in the second stage post, where I had painted a building to see how the finished effect would look. The entire board took around 6 days to paint. The flat coat of brown took 4 alone. The river took no more than 10 minutes to paint, and was done using a mix of blues, greens black and bone. Here are some photographs of the various stages leading up to the board being finished, starting by showing the different stages of paint.


The board after the brown, leather and bone coats. Starting to look like a ruined city at last...


My first attempt at the river. Hated it, looked plastic, so I had to repaint it using more greens and less lightening around the shoreline.


River complete, as well as the white drybrushing finished for the ruins.


It was at this stage I taped the edges of the boards with black duct tape to give a professional finish.


The atmosphere of a ruined, half deserted city is captured from these angles...


Smaller details like reeds, dead grass and ladders were added after everything else was finished.It was around this stage I varnished the river to give it that glossy, reflective look. Took around 4 coats of wood varnish to get this effect. As they layers build up, it tends to clump a little around things like rocks and grass, which looks all the better. May add more coats as time goes on...


The all important orc bridge was made using the leftover scraps of balse wood layered over kebab skewers for rigidity. Painted up different colors to emphasize it's shambolic construction.


The main square, complete with statues, temple to the left and the four-storey city hall in the background.


Dead trees were scattered around the board where they might have been found to add another level of foliage to the scenery.


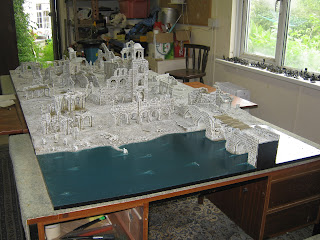
The final board in all its glory.


Just to show some detailing, and the fact that the GW ruins were used to some extent, though I personally prefer the home-made buildings better. More character.


Total time to complete:
4 months. 1 month over schedule.

Price rundown of third stage:
Scenic grasses           £8
Scenic trees               £4
Wood varnish            £6
Total                          £18

GRAND TOTAL      £203... Not fot the faint-hearted!

Wednesday 29 May 2013

OSGILIATH, PART 2


Let me start by saying this stage has taken me at least three times as long as I intended it to, but, I have neared completion of the build process and though I’d share what I’ve done so far. 

The buildings were mapped out on paper before I got stuck in, to try and give the impression of a realistic placement by the architects. Each block has been divided into a rough grid pattern, with alleyways between the buildings and so on. The embankment is covered with semi-flooded arched buildings no more than 2 floors high. After that the towers get higher to provide the defenders from the river attack with some height from which to fire arrows down from, and at the far end of the board lies the main square, complete with statue.

The way I created the walls for the buildings was to take the thicker blue foam, 10mm thick, and score brickwork onto the pieces of wall. Always use a sharp scalpel blade for this, otherwise the edges become scuffed and untidy (too untidy even for ruins). After this, I rolled a granite rock over the walls to give them a battered look, after which I hit them with the corner of a piece of wood to give the impression they were carved from rock.

The streets look a little bare still, but after all of the buildings are actually glued into place, piles of rubble and collapsed walls will fill any open areas, so the city will become very busy indeed. Anyway, here are the pictures of the ruins so far, keeping in mind a few are left to go in. Some are painted already as the buildings needed to be made in sections, otherwise trying to paint certain areas would become too fiddly. 


Here is a picture of the first tower building which I've painted up as a mock up. I'm pretty happy with the results, which came from using a base coat of bestial brown, drybrush of snakebite leather, then bleached bone, then white. All of the paints are from Dulux, mixed to match.


These images show the ruins after the sand, grit and stones were glued on. This will take at least a day, depending on the weather to dry. Filler plaster was used to cover any gaps and to make raised bits for rubble to sit. It was also used to create waves in the river, which were covered with sand and will be painted white when the river is done. I think the road tiles blend nicely with the sand, and shouldn't look to false. Next stage - painting. Completion is so close I can almost smell it!


Price rundown of second stage:
Dulux paints             £25
Extra filler                £5
Extra PVA                £2.50
GW Ruins x 4          £72
Balsa wood              £2.50
Total                         £107

Sunday 31 March 2013

OSGILIATH, PART 1


For the past month I’ve been busy building my Osgiliath board, which is beginning to take shape. I thought I’d post what I’ve been doing up to now. To start a new scenery board, the first thing you need is a design. I tried to base the board roughly on the scenes around the last attack on Osgiliath featured in the ROTK film. It had to include a river wide enough to stage an assault, an embankment complete with arches, main roads, alleyways, crumbled towers and a main square as a final objective. Once I had this in mind, I went out and bought some 2’ x 4’ MDF boards from a local builder’s supplier, 4 to be exact. These were more expensive than I remembered them being a few years ago, so I went for the thinnest boards I could find with the knowledge they would be strengthened later. After this, I set them up in pairs to make 4’ squares, attaching them together with wood.


The next step was to place on top a sheet of insulation foam, which I bought from the same supplier. At an inch think, it was perfect for creating the rise along the embankment, and with the left over 18”, I could make some ruins, rubble, whatever. Foam is a lot easier to model with as opposed to polystyrene, it’s less brittle, and easier to imprint detail.


After that was stuck down with PVA, the bridge was the next step. Once the bridge was out of the way, the road could be laid, followed by the positioning of the buildings. So, on with the bridge. It was created from 4” squares of the foam stuck back to back to create a solid object which could then be modelled into. The arches were made before hand out of smaller pieces of foam, 4x2” and 1x2”, cut at angles. Once these were stuck together, the whole object needed to be coated with a filler plaster. This stuff is gold when it comes to making scenery, as all gaps, joins and other unsightly blemishes can be smoothed over and covered up. As well as this, it’s easy to draw onto and score, so brickwork can easily be pencilled on. Thinner modelling foam was used then as side panels, to create the brickwork. I tend to use 5mm as for this scale it has a realistic thickness to it, and is durable enough for these games. They were simply cut into sheets with a very sharp scalpel, and etched with a pencil. I can't stress the importance of a sharp blade enough really. After gluing them to the sides of the bridge, the bridge itself was stuck onto the board. The bridge had to have a gap in it, to make the game more interesting as there would come a point in the battle where the Mordor reinforcements would have to lower their custom made draw bridge to allow their access. This was simply cut away from the bridge and filled where needed.


Finally for this stage, the road was laid. There might be easier ways to do this, but the way I did it was to hand cut hundreds of little tiles out of thick card and stick them down individually. This whole process took around 2 hours, excluding drying time. To me they look realistic enough, especially with the textured card I used. 


Price rundown of first stage:
MDF boards             £30
Insulation foam        £30
Modelling foam       £10
Filler                        £5
Card                         £3
Total                         £78

The second stage will consist of building the city itself, with ruins bought from GW as well as home-made ruins. After that the board will have to have sand glued to it, and the river will have to be textured. The third stage will probably consist mainly on painting the board, as well as the little details like grass and moss. You gotta love the little details.